Friday, July 5, 2019

5 Innovative Ways to Use FlipgridAR


I was super stoked to hear that Flipgrid has made augmented reality available on their platform!  Yes, you heard me correctly...FlipgridAR is a thing and I can't stop thinking of ways that this will enhance the learning experience for so many students!

In order to use FlipgridAR, you just need to make sure that you have updated the app and that you are using a device that supports augmented reality.

I'm sure that you can think of so many ways that this can work in your classroom but just in case you need a few ideas to get started, here ya go...

1.  Home Connections - Attaching a Flipgrid video to an assignment gives you, as an educator, a way to attach personal messages, instructions, or information to things that are sent home.  Create a grid or topic just for you to record videos for home.  You might include an instruction video so parents will know how to help with homework, a sweet message for the parents of a student that made a good choice, or details about an upcoming field trip.  Recording a video gives you a chance to personalize your message and share details in an innovative way that will build relationships between the classroom and home.

2.  Genius Hour Pitches - I often suggest that teachers allow students to pitch their Genius Hour projects on Flipgrid so that they can receive feedback from those that see the videos.  With FlipgridAR, you could create a space and have students place the QR code to their pitch on this wall or bulletin board.  When students have extra time, they can scan and view each other's pitches and consider giving feedback.  I'm a baseball fan so I like the idea of calling this The Bullpen because this is where pitches are thrown (see what I did there?).

3.  Book Reviews - Knowing what a peer thinks about a book is sometimes enough to cause a student to want to check it out.  I know that I enjoy watching Netflix after I've heard someone talk about a specific movie or series.  There's just something about watching something that we can talk about later or maybe I just like being "in the know".  Either way, kids are no different.  Attaching a Flipgrid QR code to the front of a book and allowing students to scan that QR code and use augmented reality to view the video of their peer's review is a great way to make this happen in the classroom.

4.  Kindness Counts - I think it's so important to make kindness and empathy a priority in the classroom.  Our learners need opportunities to be intentionally kind and empathetic toward others and the classroom is the perfect place to make this happen.  Create a Kindness Counts grid on Flipgrid and allow students to hop on when they have something nice to say about a peer or another teacher.  After recording their video, they can print out the QR code and place it somewhere specific or just somewhere that it will be seen.  I would be willing to bet that seeing a video with a kind message will bring a smile to anyone's face!

5.  Give Directions or Modify Work - I had several students in my classroom that needed to hear the directions read aloud several times or needed the directions broken down in order to understand what they needed to do.  I also had learners that needed their tests or assignments read aloud as part of the modifications that were to be provided in the classroom.  For some, this was not something that they enjoyed because it embarrassing for them to ask for something to be read again or for directions to be repeated.  As an educator, you can simply create a video or several videos of the directions broken into smaller pieces and use the QR code to attach those videos to the work.  When students need to hear the directions again, they can use headphones to watch the video rather than asking over and over again for things to be repeated.  The same can be true for things that need to be read aloud.  Create the video reading the selection or material and attach the QR code to the printed version.  The learner can scan the QR code to hear you read along with headphones making it more discreet and less of a distraction for others that are in the room.

* Be sure to find out if this is an option as far as modifications go.  Sometimes, you must do in the classroom what is going to be done on the day of standardized testing.  This is simply an idea for those that are able to make this work in their particular situation.

I hope that this is helpful and I hope you are as excited about FlipgridAR as I am.  This is a gamechanger and has the potential to make learning even more meaningful for today's learners.  Check it out and feel free to comment below with the creative ways that you are using FlipgridAR in your classroom.

You can subscribe to my email list at www.andimcnair.com.
Thursday, July 4, 2019

Book Creator + Wonderopolis = Creating a Book of Wonders

Okay, obviously I'm obsessed with Book Creator right now.  Today I sat down to create a Book of Wonders.

I often recommend Wonderopolis for educators that need something for early finishers or those that have already mastered what is being learned.  I've also suggested that they implement Wonder Wednesdays and give students an opportunity to explore Wonderopolis and learn based on their curiosity. 

If you haven't seen Wonderopolis before, let me introduce you.  I am such a fan of their work and used it in my own classroom almost every single day.  I love that students can learn new vocabulary, practice comprehension, and dive deep into a topic of their choice all on this one platform.

I also think that giving students an opportunity to explore wonders of their choice gives educators an opportunity to see what that student is interested in and what they prefer to learn about.  This is just a great way to get to know your learners.

Creating a Book of Wonders gives your students a place to document their learning from Wonderopolis and gives you an opportunity to see what they are exploring and learning about at a glance.  These books can be shared with family members so that they can ask questions at home as well.

So, what does this look like?  How can you use this in your classroom?  Check out the video tutorial below to learn more.  I hope this helps and is something you can implement immediately into your own classroom.


You can subscribe to my email list to learn even more by visiting www.andimcnair.com.


Wednesday, July 3, 2019

The 6 Ps of Genius Hour + Book Creator

After coming home from ISTE, I was looking through several of my notes and realized that I hadn't spent much time in Book Creator.  Sure, I share it sometimes with educators and talk about how it can be used as a product creation tool for students, but I hadn't considered how it might be used for students to document their experience throughout Genius Hour.

Then, I was tagged in a tweet in which Krystle Bassett shared her ISTE takeaways.  She used Book Creator to share her thoughts and I LOVED it.  I couldn't help but begin to think about how this amazing resource could be used to organize and document the 6 Ps of Genius Hour, so I got to work right away.  


I have to share how easy this was to create.  I simply considered the things that I wanted to include and then created space for those things within my book.  The finished product looked something like this...


Click HERE to see the published book

So, how did I create this and how can you create a Genius Hour Book Template for your learners?  Check out the details below.

1.  Create an account or sign into www.bookcreator.com as a teacher.
2.  Name your library.
3.  Create a new book.
4.  Choose your book shape.
5.  Design your book.
6.  Lock elements into place.
7.  Move book to library that is shared with your students.
8.  Share the library code with your learners.
9.  Instruct learners to make a copy of the book and add their content.


You can also use the Book Creator App and if your learners have iPads, you would simply share the template using AirDrop.  

Summer is the perfect time to begin thinking through what Genius Hour will look like in your classroom.  Creating a system that runs itself will allow you the time to make connections, create relationships, and weave standards and life ready skills into the projects that your students are working on.  

For more information, please visit my Genius Hour Page over on my website.

Consider how you might use this tool in your classroom.  Think beyond Genius Hour and how you might use Book Creator to create templates for other learning experiences.  The possibilities are ENDLESS!

You can create one library in Book Creator with 40 books.  In order to create even more books, you can upgrade to 180 books for $60/year or 1000 books for $120/year.  However, in order for each student in a typical classroom to create one book you can get by with the free version to see how you like it and how your students react to using the tool.  

To subscribe to my email list, please visit www.andimcnair.com
Saturday, April 20, 2019

The Possibility of the Unexplored


80% of the world's oceans are unexplored. We have no idea what exists, what's possible, and what might be beneath the surface of the unexplored waters. Because of the difficulty, risk, and cost associated with exploration, we are unaware of the potential that lies beneath. 

What if the same is true for student learning? What if we have only scratched the surface of our learners' potential because of our unwillingness to be uncomfortable, fear of taking risks, and inability to see what's possible? 


The reality is that the shallow parts of the ocean and those close to the coastline have been explored and receive much of the attention and time dedicated to exploration.  These parts are easy to access and really aren't that risky.  Sound familiar?


I know that for me, in my own classroom, teaching surface-level was easy.  I was comfortable in doing so and felt like it was where I spent much of our time.  Ever so often, we would venture into the deep unknown, but it wasn't easy and I certainly wasn't comfortable.  


Fortunately, a few years ago, my mindset shifted and I began to realize that it wasn't about what made me comfortable or how risky it was, it was about what my students needed and wanted from a learning experience.  And, they needed to go deep.  If I'm completely honest, they didn't know that they wanted to go deep at first.  They were just as scared and uncomfortable as I was.  But once we decided to take the risk and spend our time beyond the shallows and in the deep, everything changed.
So, what's the difference between surface level learning and deep understanding?  


Surface level learning is easy.  Deep understanding is difficult.

Surface level learning is comfortable.  Deep understanding is uncomfortable.

Surface level learning is about compliance.  Deep understanding involves taking risks.
Surface level learning involves worksheets and repetition.  Deep understanding involves learning through application.  
Surface level learning is often driven by the teacher.  Deep understanding is driven by the learner.


The next question is how do we move into the deep in a way that makes sense and doesn't cause everyone to want to jump ship?


Talk to your learners.  Help them understand the difference and be able to recognize when they are experiencing surface level learning and when they are experiencing deep understanding.


Observe other teachers.  Look for the ways that they are diving into the deep and be willing to ask questions and learn from them.


Try new things.  Innovative ideas such as Genius Hour and Makerspace give learners real opportunities to dive deep and learn by doing.  


Be reflective.  After a learning experience, consider the percentage that was surface level and the percentage that involved going deep.  Do you need to make adjustments?


Change your perspective.  See your role as leading learners rather than managing students.  Lead those that are ready into the deep, while continuing to prepare those that aren't.  


Look for opportunities.  When designing a learning experience, consider how it can be taken deeper.  Can it be done through questioning, real-world connections, creativity, or reflection?  


These are just a few ideas to get started.  The goal is to move beyond what has been easy and comfortable and start doing what's best for today's learners.  So, how about it, my friend?  Are you willing to go deep?  What is it about the shallow water that has kept you there for so long and might that very reason be enough to push you into the deep, unknown, unexplored waters of student learning knowing that is where the potential for real change exists?


Source:  "How much of the ocean have we explored?." 11 Jul. 2018, https://oceanservice.noaa.gov/facts/exploration.html. Accessed 20 Apr. 2019.


Wednesday, April 3, 2019

Fixing Up Your Lesson Plans


If you haven't heard of Waco, Texas, you might not be a fan of Fixer Upper on HGTV.  Chip and Joanna Gaines have created quite the stir in our little town and have created an experience unlike any other.  They are a local couple that take older homes and remodel, redesign them into beautiful living spaces that people are going crazy for right now.  They also own Magnolia Market, a place for others to find home decor similar to that used on the show.

As I drove by the Silos (a shopping experience created by Magnolia) the other day and saw people walking around with smiles on their faces, excited to be part of the Magnolia experience, I couldn't help but wonder what we need to do to make school a similar experience.  What if our students came into school looking forward to what would happen, wondering what they might see, and willing to spend time exploring, investing, and ultimately learning?

While no longer filming new shows, Fixer Upper definitely had a format that they followed.  And even though they followed that format, each show was unique, fun, and inspirational.

I recently created the 3 E's Design Template for teachers to use when designing meaningful learning experiences.  I remember hearing Dave Burgess share about creating experiences and it made so much sense to me.  That was years ago, but it made such an impact on me that I still love to share the idea of creating experiences with the educators that I am able to influence.

I've found that when I talk about designing experiences, many educators totally understand and want to do this in their classrooms.  However, so many of them just say that they aren't sure where to start.  That reason alone is why I created the 3 Es Design Template.  I wanted to make it simple for educators to implement this into their own classrooms without feeling as if they had to "recreate the wheel".

For me, using the 3 Es is super simple and makes sense.  As I watched Fixer Upper the other day, I realized how similar this idea for redesigning a lesson plan is to Chip and Joanna's ideas for redesigning a home.  Let me explain...

The 3 Es are Engage, Experience, and Empower.  The idea is to ENGAGE learners as soon as they walk into the classroom, design an EXPERIENCE that they will want to invest in, and EMPOWER them to take their learning beyond the walls of the classroom.

Engage - On Fixer Upper, the first thing Chip and Joanna do is offer choice to their clients.  They take them to different houses and share with them why they might or might not want to choose that particular property.  Choice plays an important role in engaging our learners.  When we help them know what might or might not work for them, they are able to make decisions based on who they are as learners instead of who we want them to be or think they should be.

Experience - After the home is chosen, Chip and Joanna have a great time as they demo and renovate the property.  They laugh, sometimes run into a roadblock that needs to be overcome, and work hard to create something that represents what the homeowner needs and wants from their living space.  The homeowners experience wonder, excitement, and even sometimes, a little frustration as they walk through the Fixer Upper experience.  These feelings and emotions are the same feelings and emotions that students should feel as they experience learning.  They should be given opportunities to struggle and overcome roadblocks but should also experience wonder and excitement.

Empower - Finally, Chip and Joanna give the new homeowners ownership. They turn over the keys and give the new owners full access to use what has been created.  The same needs to happen for our learners after a learning experience.  At some point, we have to give them real ownership of the learning through reflection and connections to the world beyond the walls of the classroom.  Without this piece of a learning experience, there is no why, no relevance.

So, how will you "fix up" your lesson plans?  What experiences can you design so that your learners are engaged and empowered?  Check out the 3 Es Design Template as well as the upcoming Online Course to learn more.  After doing so, you will be designing experiences in a way that is so much more fun and will make learning meaningful for your students.


Listen to the podcast about the 3 E's below or on iTunes by clicking HERE.


Thursday, March 21, 2019

Reflecting on Flipgrid

So, it's no secret that I think reflection is not just important but imperative for every learner.  Finding time to reflect and ensuring that the reflection is meaningful is not always easy.  I think the first thing that has to be considered is the difference between reflection and remembering.  We have asked students in our classrooms to remember...remember a fact, remember a strategy, or remember a deadline.  But what if we began to focus on reflection and what's the difference.  I think it's fairly simple.  Remembering is what I did and how, reflection is what I learned and why.

Creating a reflection grid on Flipgrid is a great way to make reflection meaningful and manageable.  I'm a huge fan of the Reflection QR Code from Tony Vincent.   This is a randomized code, which means that students can scan the same code and receive different questions.  I talk about it all the time as I used it in my own classroom to help my students learn to move from simply remembering to reflecting.  I wish I had known about Flipgrid because by smashing these two things together, you can create a really cool reflection opportunity for your learners.

Here's how I created my Reflection Grid and it was super easy!

1.  Create a grid on Flipgrid and name it "Reading Reflections" or "Today's Takeaways" (you get the idea.)
2.  Create your topic where your learners will post their reflections.
3.  Set up the amount of time you want to give them to reflect.  I think 2-3 minutes is perfect.
4.  Describe what you would like for them to do in the description.

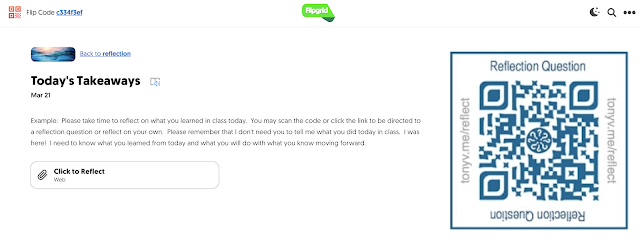
Example:  Please take time to reflect on what you learned in class today.  You may scan the code or click the link to be directed to a reflection question or reflect on your own.  Please remember that I don't need you to tell me what you did today in class.  I was here!  I need to know what you learned from today and what you will do with what you know moving forward.  

5.  Under Topic Resource, choose Upload an Image.  Download the reflection QR code image from Tony's website and add it to the grid.  (Choose the 1:1 crop ratio so that it will fit.)
6.  For Topic Attachment, add the link to Tony's reflection questions - tonyv.me/reflect.  This will give students the opportunity to simply click for a random reflection question.
7.  Name the attachment, Click to Reflect
8.  Create your topic.

Here's what your students will see...


That's it!  Share the link to the topic with your learners and make this a priority every single day.  Giving students an opportunity to reflect gives them an opportunity to connect to the content.  In doing so, they will reach a deeper level of understanding as it becomes personal.

I hope that you find this quick tip helpful and something that you can easily implement into your own classroom.  Feel free to comment below and let me know what you think!

Monday, February 4, 2019

6 Ps of Genius Hour Global Grid

I have exciting news and I absolutely can't keep it in any longer! The 6 Ps of Genius Hour are going global! When talking about Genius Hour, we often talk about the importance of an authentic audience. While it sounds like a great idea, finding ways to connect our learners is not always easy and can often seem like more work.

Because I'm no longer in the classroom, I miss being able to give feedback, share ideas, and help learners make connections through their Genius Hour projects. I was recently trying to think of a way to solve both of these issues. I realized that while I've been encouraging educators to create their own Flipgrids for Genius Hour, it would be more beneficial to have a Global Grid for students to share ideas, give each other feedback, and connect with other learners all over the world.

The 6 Ps of Genius Hour is a process that I created to help Genius Hour make sense to my learners. Throughout the process, my students would identify their passion(s), plan their project, pitch their idea to their peers, work on a project to develop a product, and then give a presentation.


CLICK HERE for a PDF with links to the tech tools.

Within the grid, there is a permission slip to send home to parents, instructions on how to use the grid, and videos for students to watch to understand what they need to do in order to share their ideas, reflections, and thoughts. In each of the topics, I have recorded to a video sharing encouraging words and what needs to be posted.

My hope is that this grid will help our learners practice life-ready skills such as collaboration, communication, creativity, critical thinking, and reflection while pursuing their passions. I hope that it impacts educators and learners all over the world and gives us all an opportunity to work together to make a difference in the world. Selfishly, it will give me an opportunity to connect with learners and help them with their projects just as I did with my own students while I was in the classroom. I miss seeing those lightbulb moments and watching my students light up when they were successful or persevere when they experienced failure or frustration.

If you would like to learn more about the 6 Ps of Genius Hour, you can check out my book, Genius Hour: Passion Projects that Ignite Innovation and Student Inquiry or the 6 Ps of Genius Hour Online Course. Both resources are a deep dive into the process and will help you as an educator find ways to weave the standards and life-ready skills into your Genius Hour time with your learners.

Access the Genius Hour Global Grid HERE!


Some important tips for using the Genius Hour Global Grid in your classroom...

1. Obtain permission from parents before allowing students to post.
2. Remind students to use communication skills (eye contact, nonverbal skills, listening) when sharing ideas, giving feedback, and learning together.
3. Use this as an opportunity to discuss digital citizenship and remind students to promote themselves positively.
4. Allow students to record as many times as they would like in order to share their ideas. This many be new for many of them and it's important that they are given the opportunity to produce a video that they feel comfortable sharing.

I am so excited about this and can't wait to see what happens! I look forward to hearing how the 6 Ps help you and your learners make Genius Hour a reality in your classroom!